It’s 5:30 PM on a Tuesday, the sun is setting, and my kids have just walked through the door looking like they’ve been dragged through a hedge backward. They’re hangry. I’m exhausted. The fridge is half-empty except for a bruised banana and a jar of peanut butter that’s been sitting there since last summer. I don’t have time to cook dinner, and I definitely don’t have the energy to raid the pantry for some complex snack.
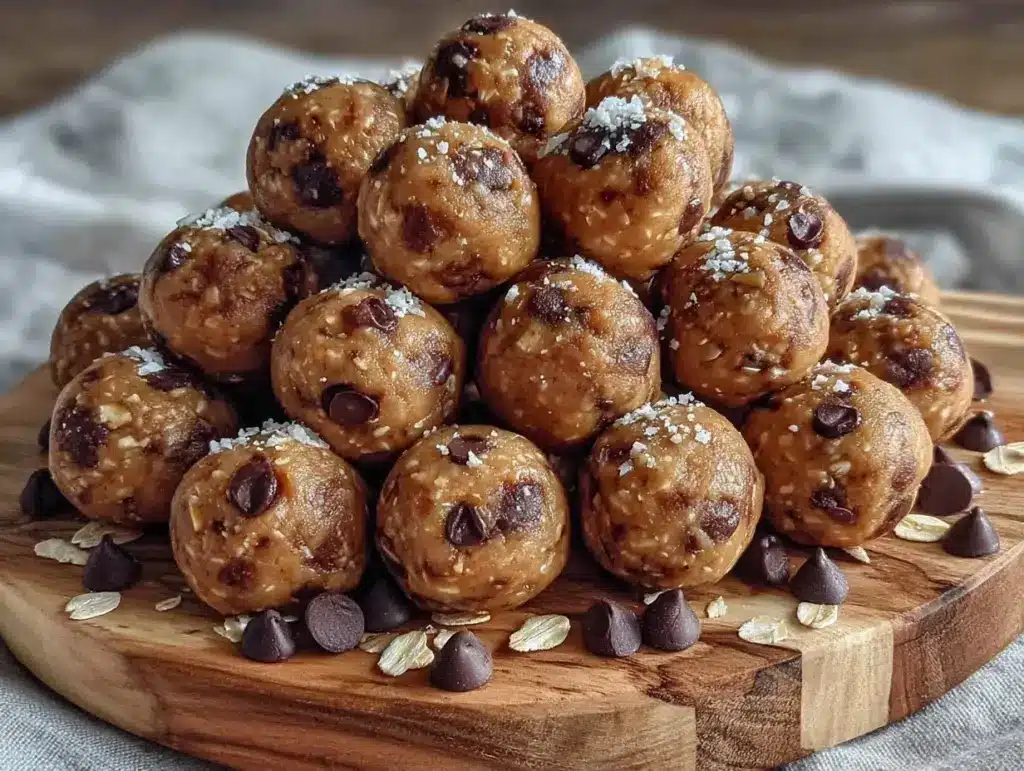
This is the moment where most people would cave and reach for the granola bar box. But I’ve learned that those things are basically sugar bombs with a side of cardboard. Instead, I whipped up these Back to School Peanut Butter Banana Energy Bites. They took four minutes. Four. Minutes. And suddenly, the hangry mood shifted to genuine delight.
I’ve made these little peanut butter balls about fifty times since June. They’re the reason I survive the back-to-school rush without losing my mind. They’re no-bake, they require zero cleanup, and they taste like dessert but pack enough energy to last through soccer practice or homework sessions. If you’re drowning in the afternoon chaos, trust me—this is your new best friend.
Why You’ll Love This Recipe
Look, I’m not trying to sell you on a gourmet experience here. I’m selling you on survival. But honestly? These energy bites are so good that my kids think they’re getting away with something sweet. Here’s why this recipe has earned a permanent spot in my rotation:
- Zero Baking Required — Seriously. No oven, no preheating, no waiting. I mix it in a bowl, roll them up, and toss them in the fridge. It’s the ultimate low-effort win.
- Only Five Ingredients — You likely have everything in your kitchen right now. Peanut butter, banana, oats, honey, and maybe a pinch of salt. That’s it. No weird health food store runs needed.
- Grab-and-Go Convenience — These are perfect for lunchboxes. They don’t melt in the heat like chocolate chips, and they don’t get squished like muffins. My son’s lunchbox is full of these, and they come out looking just as good as when he put them in.
- Actually Nutritious — They’re not just sugar. You’ve got protein from the peanut butter, fiber from the oats, and potassium from the banana. It’s a balanced snack that keeps their blood sugar stable, which means fewer meltdowns later.
- Kid-Approved Taste — They taste like a peanut butter cookie dough ball. Yes, really. My picky eater who usually refuses anything “healthy” asks for these daily. I’m not complaining.
It’s the kind of recipe that feels like a cheat code for parenting. You get to claim you’re feeding them something wholesome while they think they’re eating a treat. Win-win.
Ingredients You’ll Need
Here’s the beauty of this Back to School Peanut Butter Banana Energy Bites recipe: the ingredient list is shorter than my grocery list for a proper dinner. You don’t need fancy superfoods or expensive imports. Just simple, pantry staples.
The Base
Ripe Bananas (2 medium) — This is non-negotiable. They need to be spotted. Brown spots mean sugar, and sugar means sweetness. If your bananas are still green, these bites will taste bland and doughy. Mash them until they’re basically banana soup.
Peanut Butter (½ cup / 120g) — Use natural, creamy peanut butter. No oil separation, no added sugar. If you have crunchy peanut butter, you can use it, but the texture will be different. I prefer creamy for that smooth, cookie-dough bite. Note: If your kids are allergic to peanuts, this recipe works beautifully with sunflower seed butter or almond butter.
The Binder
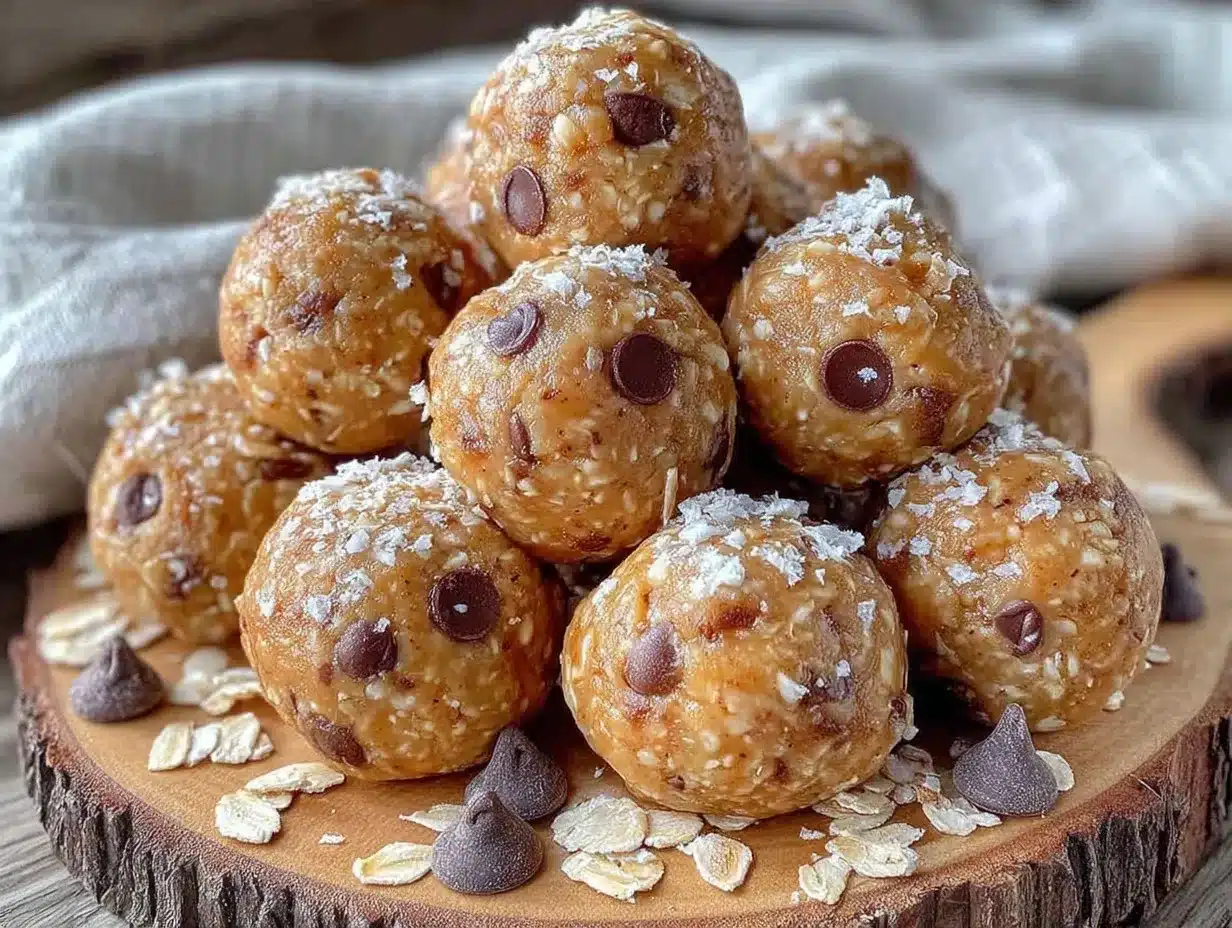
Old-Fashioned Rolled Oats (1 ½ cups / 135g) — Do not use instant oats or steel-cut oats. Instant oats turn to mush, and steel-cut oats are too hard. You need the hearty chew of rolled oats. This is what gives the bites structure. If you need gluten-free, make sure your oats are certified GF.
Honey (2 tablespoons / 30ml) — Just a little bit to bind everything together and add a touch of floral sweetness. Maple syrup works too if you want to keep it vegan, but honey tastes richer.
The Flavor Boosters
Vanilla Extract (1 teaspoon) — This makes them taste like actual dessert. Don’t skip it. It adds that warm, bakery smell that makes your kitchen feel cozy.
Salt (a tiny pinch) — It might seem weird in a sweet snack, but salt makes the peanut butter flavor pop. It balances the sweetness so it doesn’t taste cloying.
Optional Mix-ins — I sometimes throw in a handful of mini chocolate chips or a tablespoon of chia seeds. But honestly? The plain version is perfect. I keep it simple because simplicity means fewer decisions at 5 PM.
Equipment Needed
You don’t need a food processor or a stand mixer. In fact, using fancy tools might make this harder. Here’s what I actually use:
- Medium Mixing Bowl — Any bowl will do. I use a ceramic one because it doesn’t slide around when I’m mashing bananas.
- Fork — For mashing the bananas. A potato masher works too, but a fork is faster for just two bananas.
- Spoon — For stirring the oats and peanut butter into the banana mash.
- Baking Sheet — To line with parchment paper. You don’t strictly need parchment, but it makes cleanup instant. I hate washing sticky bowls.
- Small Cookie Scoop — (Optional) — I have a tiny ice cream scoop. It helps make uniform balls. But honestly, you can just use your hands. It’s faster.
That’s it. One bowl, one spoon, one sheet. You’ll be done before the water boils for pasta.
How to Make It: Step-by-Step
Alright, let’s make these. I’m going to walk you through exactly how I do it, including the little tricks that keep them from falling apart.
Step 1: Mash the Bananas (2 minutes)
Peel your ripe bananas and throw them into the mixing bowl. Use your fork to mash them until there are no big chunks left. You want a smooth, almost liquidy puree. If you leave chunks, the bites will be lumpy and hard to roll. Pro tip: If your bananas are huge, you might only need one and a half. Measure by volume if you’re unsure.
Step 2: Add the Wet Ingredients (1 minute)
Stir in the peanut butter, honey, and vanilla extract. Mix it well. It should look like a thick, glossy paste. If it looks too dry, add a teaspoon more honey. If it’s too runny, you might need a splash more oats. You’re aiming for a consistency like thick dough.
Step 3: Fold in the Oats (2 minutes)
Pour in the rolled oats and the pinch of salt. Stir until everything is evenly coated. The oats will start to absorb the moisture from the banana and peanut butter. It will look like a shaggy dough. This is normal. Don’t panic. If it’s too sticky to handle, refrigerate the mixture for 10 minutes. It firms up the peanut butter and makes rolling easier.
Step 4: Roll the Bites (5 minutes)
Line a baking sheet with parchment paper. Take a tablespoon of the mixture and roll it between your palms to form a ball. Aim for about 1-inch balls. They don’t need to be perfect spheres. Rough balls are charming and cook (chill) evenly. Place them on the baking sheet. Keep a little space between them so they don’t stick together.
Step 5: Chill (At least 30 minutes)
This is the hardest part. You want to eat one immediately. But you need to chill them. The cold sets the peanut butter and binds the oats. Put the tray in the fridge for at least 30 minutes. If you’re in a rush, the freezer works too—20 minutes in the freezer is enough. Once they’re firm, transfer them to an airtight container.
Total Time: About 10 minutes active, plus 30 minutes chilling.
Expert Tips & Tricks
I’ve made these dozens of times, and I’ve learned a few things the hard way. Here’s how to ensure your Back to School Peanut Butter Banana Energy Bites come out perfect every time.
- Use Overripe Bananas — I cannot stress this enough. Green bananas will not work. They won’t mash well, and they won’t sweeten the mixture. Wait until the peel is covered in brown spots. If your bananas are still good, freeze them peeled and mashed for future energy bites.
- Don’t Skimp on the Chill Time — Freshly rolled bites are soft and sticky. They’re delicious, but they’re messy. If you pack them in a lunchbox warm, they’ll turn into a peanut butter smear. Chill them until they’re firm.
- Wet Your Hands — If the mixture is sticking to your fingers, wet your hands with a little water. It prevents sticking and makes rolling smoother. I keep a small bowl of water next to the mixing bowl.
- Storage is Key — These keep in the fridge for up to a week. In the freezer, they last for three months. I usually make a double batch and freeze half. They thaw quickly, so grab one straight from the freezer if you’re in a rush.
- Texture Tweaks — Want them chewier? Add a tablespoon of maple syrup. Want them crunchier? Add a tablespoon of chopped peanuts. But keep it simple. The classic version is classic for a reason.
One mistake I used to make was making the balls too big. If they’re bigger than an inch, the center stays soft even after chilling. Stick to small balls. They’re easier to eat for little hands, and they set faster.
Variations & Substitutions
Once you’ve mastered the basic version, here’s how you can mix it up. I’ve tried all of these, and they’re all winners.
Nut-Free Version
Swap the peanut butter for sunflower seed butter or almond butter. Sunflower seed butter has a slightly different flavor but works perfectly. It’s great for school-safe lunches.
Chocolate Lover’s
Stir in ½ cup of mini chocolate chips before rolling. They melt slightly in the peanut butter mixture, creating little pockets of chocolate. My kids lose their minds over these.
Protein Boost
Add a scoop of vanilla protein powder. It makes the mixture drier, so you might need an extra tablespoon of honey or milk. Great for post-workout snacks.
Dairy-Free & Vegan
This recipe is naturally dairy-free. Just ensure your peanut butter doesn’t contain added honey if you’re strictly vegan. Use maple syrup instead of honey.
Breakfast Bites
Add a tablespoon of chia seeds or flaxseed. They add omega-3s and help bind the mixture. I make these on Sunday mornings to eat for breakfast during the busy week.
Serving & Storage
These are best served cold. That’s when the peanut butter is firm and the banana is sweet. I usually keep a container in the fridge and one in the freezer.
How to Store
Fridge: Place in an airtight container. They’ll last up to 7 days. If you stack them, put parchment paper between layers so they don’t stick.
Freezer: Freeze them on a baking sheet first, then transfer to a freezer bag. This prevents them from clumping together. They’ll last for 3 months.
Reheating
You don’t need to reheat them. Eat them cold or at room temperature. If they’ve been in the freezer, let them sit for 5 minutes to soften slightly.
These are perfect for lunchbox cookies or as a pre-workout snack. They pair well with a glass of milk or a smoothie. I also love them with a side of cinnamon apple nachos for a balanced afternoon snack.
Nutrition Information
I’m not a nutritionist, but here’s the breakdown if you’re tracking. These are nutrient-dense, but they are still energy bites.
Per serving (based on 12 bites):
- Calories: 90
- Protein: 3g
- Carbs: 10g
- Fiber: 1g
- Sugar: 6g
- Fat: 4g
- Saturated Fat: 0.5g
- Sodium: 15mg
These are a great source of quick energy. The oats provide sustained release carbs, and the peanut butter offers healthy fats and protein. They’re not a diet food, but they’re a far cry from a candy bar. I use them to fuel my kids through their afternoon activities.
Final Thoughts
So there you have it—my go-to Back to School Peanut Butter Banana Energy Bites. I’ve probably talked your ear off at this point, but when you make a recipe this often, you have a lot to say about it.
This has saved me more times than I can count. It’s my answer to “what’s for snack?” when I’m tired, don’t want to go to the store, and still want to feed my kids something good. My kids are happy, I’m happy because I’m not stressed, and we’re all happy because we’re not eating processed junk.
Make it yours! Try different nut butters, add chocolate chips, or mix in some seeds. The best recipes are the ones you adapt to your family’s tastes. If you make this, drop a comment and let me know what you think! I love hearing how recipes turn out in your kitchen. And if something doesn’t work, tell me that too—I’m here to help troubleshoot.
Happy snacking! And I hope your kitchen smells half as good as mine does right now.
Frequently Asked Questions
Can I use crunchy peanut butter?
Yes, you can! It will add a nice texture to the bites. However, if you prefer a smoother, more uniform bite like a cookie dough ball, stick with creamy. Just know that crunchy might make the balls slightly harder to roll.
Why are my energy bites too sticky?
This usually means the bananas were too wet or not ripe enough, or you didn’t add enough oats. If they’re too sticky to roll, add another quarter cup of oats and mix well. If they’re still sticky, refrigerate the mixture for 15 minutes to firm up the peanut butter.
Can I freeze these?
Absolutely. They freeze beautifully. Just make sure they’re fully chilled and firm before freezing. Store them in a freezer-safe bag or container. They’ll last for up to 3 months. Thaw them in the fridge or eat them straight from the freezer.
How long do these last in the fridge?
They last up to 7 days in an airtight container. After that, the bananas might start to brown slightly, and the texture might change. I usually make a batch that lasts about 5 days, so I don’t run into this issue.
Can I make these with almond butter?
Yes! Almond butter works perfectly. It has a slightly different flavor, but the texture and binding properties are similar. It’s a great option if you want to vary the taste or avoid peanuts.
Do I need to bake these?
No! This is a no-bake recipe. The cold sets the peanut butter and binds the oats. Baking them would dry them out and change the texture completely. Just chill them in the fridge.
Can I use quick oats instead of rolled oats?
I wouldn’t recommend it. Quick oats are too fine and will turn the mixture into a mush. Rolled oats provide the necessary chew and structure. If you must use quick oats, reduce the amount slightly, but rolled oats are best.
Pin This Recipe!
Back to School Peanut Butter Banana Energy Bites
- Total Time: 40 minutes
- Yield: 12 servings 1x
Description
A quick, no-bake 5-ingredient snack made with peanut butter, banana, and oats. These energy bites are kid-approved, nutritious, and perfect for busy after-school rushes.
Ingredients
- 2 medium ripe bananas
- 1/2 cup (120g) creamy natural peanut butter
- 1 1/2 cups (135g) old-fashioned rolled oats
- 2 tablespoons honey
- 1 teaspoon vanilla extract
- 1 pinch salt
- Optional: mini chocolate chips or chia seeds
Instructions
- Peel ripe bananas and mash them in a medium mixing bowl until smooth and liquidy.
- Stir in the peanut butter, honey, and vanilla extract until the mixture forms a thick, glossy paste.
- Add the rolled oats and salt, stirring until evenly coated and the mixture resembles a shaggy dough.
- If the mixture is too sticky, refrigerate for 10 minutes to firm up.
- Line a baking sheet with parchment paper.
- Roll tablespoon-sized portions of the mixture between your palms to form 1-inch balls.
- Place balls on the baking sheet, leaving space between them.
- Refrigerate for at least 30 minutes (or freeze for 20 minutes) until firm.
- Transfer to an airtight container for storage.
Notes
Use overripe bananas for natural sweetness. If using crunchy peanut butter, the texture will be different. For nut-free versions, substitute sunflower seed butter. Store in the fridge for up to 7 days or freeze for up to 3 months.
- Prep Time: 10 minutes
- Cook Time: 0 minutes
- Category: Snack
- Cuisine: American
Nutrition
- Serving Size: 1 energy bite
- Calories: 90
- Sugar: 6
- Sodium: 15
- Fat: 4
- Saturated Fat: 0.5
- Carbohydrates: 10
- Fiber: 1
- Protein: 3
Keywords: energy bites, no-bake snacks, peanut butter banana, kid snacks, back to school snacks, healthy snacks, gluten-free options