Last August, as the first school bell rang in my neighborhood, I found myself scrambling to come up with lunch ideas that weren’t just “peanut butter and jelly again.” My kids wanted something fun, portable, and quick to eat between classes—and frankly, I was done with the usual sandwich routine. That’s when I stumbled on this idea of Back to School Turkey and Cheese Lunchbox Kabobs. It started as a last-minute throw-together with ingredients I already had in the fridge and pantry, and it became an instant hit.
The best part? These kabobs are super simple, just five ingredients, and they look colorful and inviting—like little edible kebabs that kids actually want to eat. I made them the night before and packed them right into the lunchbox for the next day. No mess, no squished sandwiches, just easy, tasty bites. After testing and tweaking this recipe over several school weeks, it’s now a staple in our lunch rotation.
Here’s the thing: packing lunches doesn’t have to be a chore or a battle every single morning. If you want something that’s fuss-free, healthy, and kid-approved, this turkey and cheese kabob recipe is your new best friend.
Why You’ll Love This Recipe
This recipe has completely changed my back-to-school lunch game. Seriously, there are a handful of reasons I keep coming back to these kabobs:
- 5 Simple Ingredients — No crazy shopping trips required. I always have these basics on hand, which means last-minute lunches aren’t stressful.
- Perfect Portion Control — Each kabob is just enough for little hands and growing appetites. My kids can grab and eat without fuss.
- Kid-Approved — I’ve made these for my picky eater and my adventurous one, and both request them regularly. They even ask for seconds!
- Easy to Customize — Swap out turkey for ham or add veggies like cherry tomatoes or cucumber slices. Endless variations without extra work.
- Prep-Ahead Friendly — I make a batch on Sunday night, store them in the fridge, and they’re ready to go all week. Saves precious morning minutes.
- Mess-Free Eating — No crumbs or smushed sandwiches in sight. These kabobs make lunchtime cleaner and more fun.
This isn’t just a recipe; it’s a little back-to-school survival hack that takes the stress out of packing lunches while keeping your kids happy and fueled for their day.
Ingredients You’ll Need
Here’s the best part: you probably already have most of these in your fridge or pantry. I’m picky about freshness with the turkey and cheese, so I’ll explain why those matter.
- Turkey slices (8 ounces / 225g) — I go for low-sodium, nitrate-free deli turkey. It tastes fresher and feels healthier. If you prefer, ham or chicken slices work just as well.
- Cheddar cheese
- Green grapes (1 cup / 150g) — Fresh, seedless, and firm grapes add a juicy burst. I avoid overripe ones because they get mushy on kabobs.
- Cherry tomatoes (1 cup / 150g, halved) — Adds color and a fresh pop. If you want, you can swap for cucumber slices or bell pepper pieces.
- Wooden skewers (6-8 inches) — Safe for kids and easy to handle. You can find these at any grocery or kitchen store. Soak them in water for 10 minutes before assembling to prevent burning if you want to grill or broil later.
Quick tip: When shopping, pick firm, cold grapes and tomatoes to keep these kabobs fresh longer. Also, if you’re feeling fancy, a little sprinkle of Italian seasoning over the cheese cubes before assembling adds a subtle herby note.
Equipment Needed
You don’t need fancy tools for this. Here’s what I use in my kitchen:
- Cutting board — Any size works. I like plastic boards for easy cleanup.
- Sharp knife — For cubing the cheese and halving tomatoes. A dull knife turns slicing into a struggle.
- Measuring cups — Just to portion grapes and tomatoes, but eyeballing works too if you’re in a rush.
- Wooden skewers — As mentioned, soak them if you plan to grill, otherwise dry is fine.
- Storage container or lunchbox — Airtight ones work best to keep everything fresh.
If you don’t have skewers, you can use fun alternatives like small reusable picks or even sturdy toothpicks for smaller children (with supervision).
How to Make It: Step-by-Step

Alright, let’s put these together! I’m walking you through the easiest way to assemble these lunchbox kabobs so they look great and stay fresh.
Step 1: Prep Your Ingredients (10 minutes)
Start by washing the grapes and cherry tomatoes. Halve the tomatoes and pat everything dry with a paper towel so the kabobs don’t get soggy. Next, cut the block of cheddar cheese into 1-inch cubes—keep them roughly the same size so everything fits nicely on the skewers. Tear or fold the turkey slices into bite-sized pieces about the same size as the cheese cubes. This keeps the kabobs balanced and easy to eat.
Step 2: Assemble the Kabobs (10 minutes)
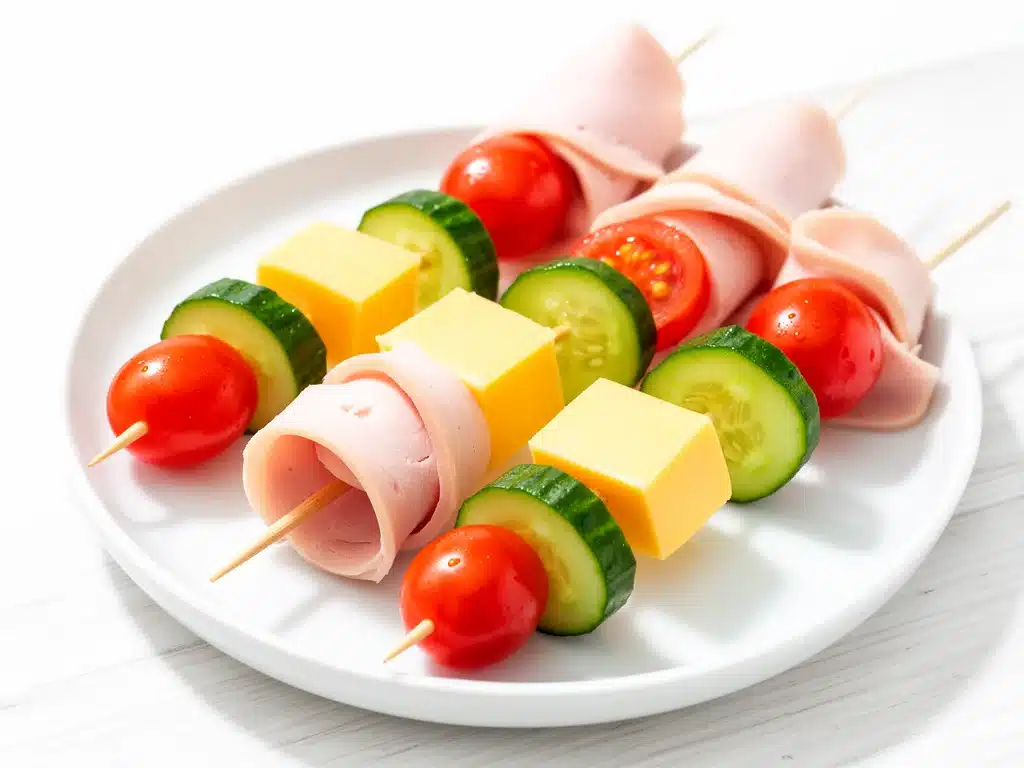
Take a wooden skewer and slide on one piece of turkey, then a cube of cheese, followed by a grape and a cherry tomato half. Repeat the pattern until you have 4-5 pieces on each skewer, leaving a little space at each end so they’re easy to hold. I usually make 8 kabobs for our family of four, which fits perfectly in a lunchbox.
Step 3: Store and Pack (5 minutes)
Place your kabobs in an airtight container lined with a paper towel to absorb any moisture. Store in the refrigerator until ready to pack into lunchboxes. These hold up well for 3-4 hours without getting soggy or wilted. Before packing, I add a small ice pack to keep everything cool and fresh.
Step 4: Serve
If you want to get fancy, serve with a little side of ranch or honey mustard for dipping. My kids love dunking their kabobs—it makes lunch feel like a mini party.
Expert Tips & Tricks
- Choose firm ingredients: Soft or overripe grapes and tomatoes can make the kabobs soggy. Pick fruit that’s fresh and crisp to keep them intact all day.
- Keep cheese cubes uniform: This helps everything cook evenly if you want to warm them up later and makes the kabobs look professional.
- Make them the night before: I prep these after dinner and refrigerate overnight. Mornings are hectic; this saves me so much time.
- Use low-sodium turkey: Deli meats can be salty. Choosing low-sodium options helps balance flavors and keeps lunch healthier.
- Don’t overcrowd the skewer: Leave a bit of space at the ends so kids can hold them easily without poking their fingers.
- Try different cheese types: Swiss, mozzarella, or pepper jack add variety if your kids get bored of cheddar.
- Keep wooden skewers safe: Soak them before grilling or remove before packing to avoid pokes and scratches for smaller kids.
Variations & Substitutions
Once you’ve nailed this basic version, it’s fun to switch things up. I’ve tried these variations with great success:
- Ham and Swiss Kabobs — Swap turkey for ham and cheddar for Swiss cheese. Adds a mild, creamy flavor.
- Veggie Boost — Add cucumber slices, bell pepper chunks, or baby carrots between the meat and cheese for more crunch.
- Fruit Swap — Replace grapes with apple slices or strawberries for a sweeter twist. Just add a squeeze of lemon to keep apples from browning.
- Spicy Kick — Add a few pickles or olives for tang and a little heat. My husband loves this version.
- Gluten-Free Option — Naturally gluten-free, but double-check your deli meat ingredients if you’re sensitive.
- Dairy-Free — Use dairy-free cheese cubes or skip cheese and add extra veggies and fruit.
Serving & Storage
How to Serve: These kabobs are perfect cold straight from the lunchbox or served alongside your favorite dips like hummus or ranch dressing. They also make a fantastic snack or party finger food.
Storage: Store assembled kabobs in an airtight container in the fridge for up to 2 days. If you want to prep ingredients ahead, keep turkey, cheese, and produce separate and assemble just before packing to keep everything extra fresh.
Reheating: These are meant to be eaten cold, but if you want to warm the cheese, remove kabobs from skewers and microwave briefly. Avoid microwaving whole skewers to keep the wooden sticks safe.
Nutrition Information
| Nutrient | Per Serving (2 kabobs) |
|---|---|
| Calories | 220 |
| Protein | 15g |
| Carbohydrates | 12g |
| Fiber | 1g |
| Sugar | 5g |
| Fat | 12g |
| Saturated Fat | 7g |
| Sodium | 320mg |
| Calcium | 180mg |
This recipe is a solid source of protein and calcium, thanks to the turkey and cheddar cheese. The fruit adds natural sweetness and a bit of fiber. It’s not a diet meal, but it’s packed with nutrients to keep kids energized through their school day.
Final Thoughts
So that’s the lowdown on my Back to School Turkey and Cheese Lunchbox Kabobs. I know I’ve probably gone on and on, but when a recipe saves my mornings and keeps my kids happy, I get a little excited. These kabobs are more than just food—they’re a tiny lunchtime win that makes school days a bit smoother for everyone.
Don’t be afraid to make them your own! Switch up the fruits, the cheese, or even the protein. The best meals are the ones that fit your family’s tastes and pace.
If you try these kabobs, please drop a comment and tell me how it went. I want to hear your twists and any questions you have—because we’re all figuring this lunch thing out together.
Happy packing and even happier eating!
Frequently Asked Questions
Q: Can I use pre-sliced turkey instead of deli meat?
A: Pre-sliced turkey from the deli counter works best because it’s fresh and tender. Packaged sliced turkey can be used in a pinch, but sometimes it’s drier or more processed. Just make sure it’s not too thick to skewer nicely.
Q: How long do these kabobs stay fresh in the fridge?
A: Assembled kabobs keep well for about 2 days in an airtight container. After that, the grapes and tomatoes might start to release moisture and soften. For maximum freshness, assemble the night before or the morning of.
Q: Can I make these kabobs gluten-free?
A: Definitely! Turkey, cheese, grapes, and tomatoes are naturally gluten-free. Just double-check your deli meat’s ingredients to avoid hidden gluten in preservatives or flavorings.
Q: What’s the best way to keep the kabobs from being messy in the lunchbox?
A: I line the container with a paper towel to soak up any moisture and pack the kabobs snugly so they don’t roll around. Adding an ice pack keeps everything cool and crisp until lunchtime.
Q: Can I substitute the grapes with another fruit?
A: Absolutely! Apple slices, strawberries, or even pineapple chunks work well. Just remember to toss apple slices in a little lemon juice to prevent browning.
Q: Are wooden skewers safe for kids to eat from?
A: For older kids, yes. For younger kids, especially under 6, I recommend cutting skewers shorter and supervising during lunch. Alternatively, use food picks or toothpicks for smaller portions.
Q: Can I prepare the ingredients ahead of time and assemble the kabobs in the morning?
A: Yes! Pre-cutting cheese, slicing turkey, and washing fruit the night before saves time. Assemble just before packing to keep everything fresh and prevent sogginess.
One last thought: if you’re looking for other easy, kid-friendly recipes to keep your lunchbox game strong, I love pairing these kabobs with a batch of homemade applesauce or a side of crispy garlic chicken for quick dinners that your whole family will enjoy.
Pin This Recipe!


Back to School Turkey and Cheese Kabobs
- Total Time: 15 minutes
- Yield: 8 kabobs (4 servings) 1x
Description
These easy 5-ingredient turkey and cheese kabobs are a fun, portable, and kid-approved lunchbox recipe perfect for back-to-school. They are quick to prep, mess-free, and customizable with fresh ingredients.
Ingredients
- 8 ounces low-sodium, nitrate-free deli turkey slices
- 8 ounces cheddar cheese, cut into 1-inch cubes
- 1 cup green grapes, fresh and seedless
- 1 cup cherry tomatoes, halved
- Wooden skewers (6-8 inches), soaked in water for 10 minutes if grilling
Instructions
- Wash grapes and cherry tomatoes. Halve the tomatoes and pat all produce dry with a paper towel.
- Cut cheddar cheese into 1-inch cubes, keeping them uniform in size.
- Tear or fold turkey slices into bite-sized pieces about the same size as the cheese cubes.
- Take a wooden skewer and slide on one piece of turkey, then a cube of cheese, followed by a grape and a cherry tomato half. Repeat until 4-5 pieces are on each skewer, leaving space at each end.
- Make 8 kabobs for a family of four and place them in an airtight container lined with a paper towel to absorb moisture.
- Store in the refrigerator until ready to pack into lunchboxes. Add a small ice pack to keep fresh.
- Serve cold or with a side of ranch or honey mustard for dipping.
Notes
Use low-sodium, nitrate-free deli turkey for freshness and health. Soak wooden skewers before grilling to prevent burning. Keep cheese cubes uniform for even assembly. Store kabobs in an airtight container lined with a paper towel to absorb moisture and keep fresh up to 2 days. For younger kids, consider shorter skewers or food picks for safety.
- Prep Time: 10 minutes
- Cook Time: 0 minutes
- Category: Lunchbox Recipe
- Cuisine: American
Nutrition
- Serving Size: 2 kabobs per serving
- Calories: 220
- Sugar: 5
- Sodium: 320
- Fat: 12
- Saturated Fat: 7
- Carbohydrates: 12
- Fiber: 1
- Protein: 15
Keywords: turkey kabobs, cheese kabobs, lunchbox ideas, kid-friendly lunch, easy lunch, back to school recipe, healthy snacks